
The most expensive mistake in the whole course is not crooked joints or a cracked tile, but water in the flat of the neighbours below. Relaying your own tiles is frustrating. Compensating the neighbours for their ceiling, wallpaper and appliances costs far more — and it comes to light months later, when everything has already been tiled.
In this unit you will learn to determine where waterproofing is needed, choose the material, apply it in the right order and check it with a flood test. The example figures are for Ceresit CL 51, a ready-mixed membrane widely used in Ukraine, and CT 17 primer. If you buy a different product, check everything against its technical data sheet: the data sheet on the bucket matters more than this course.
1. Why, if tiles don't let water through
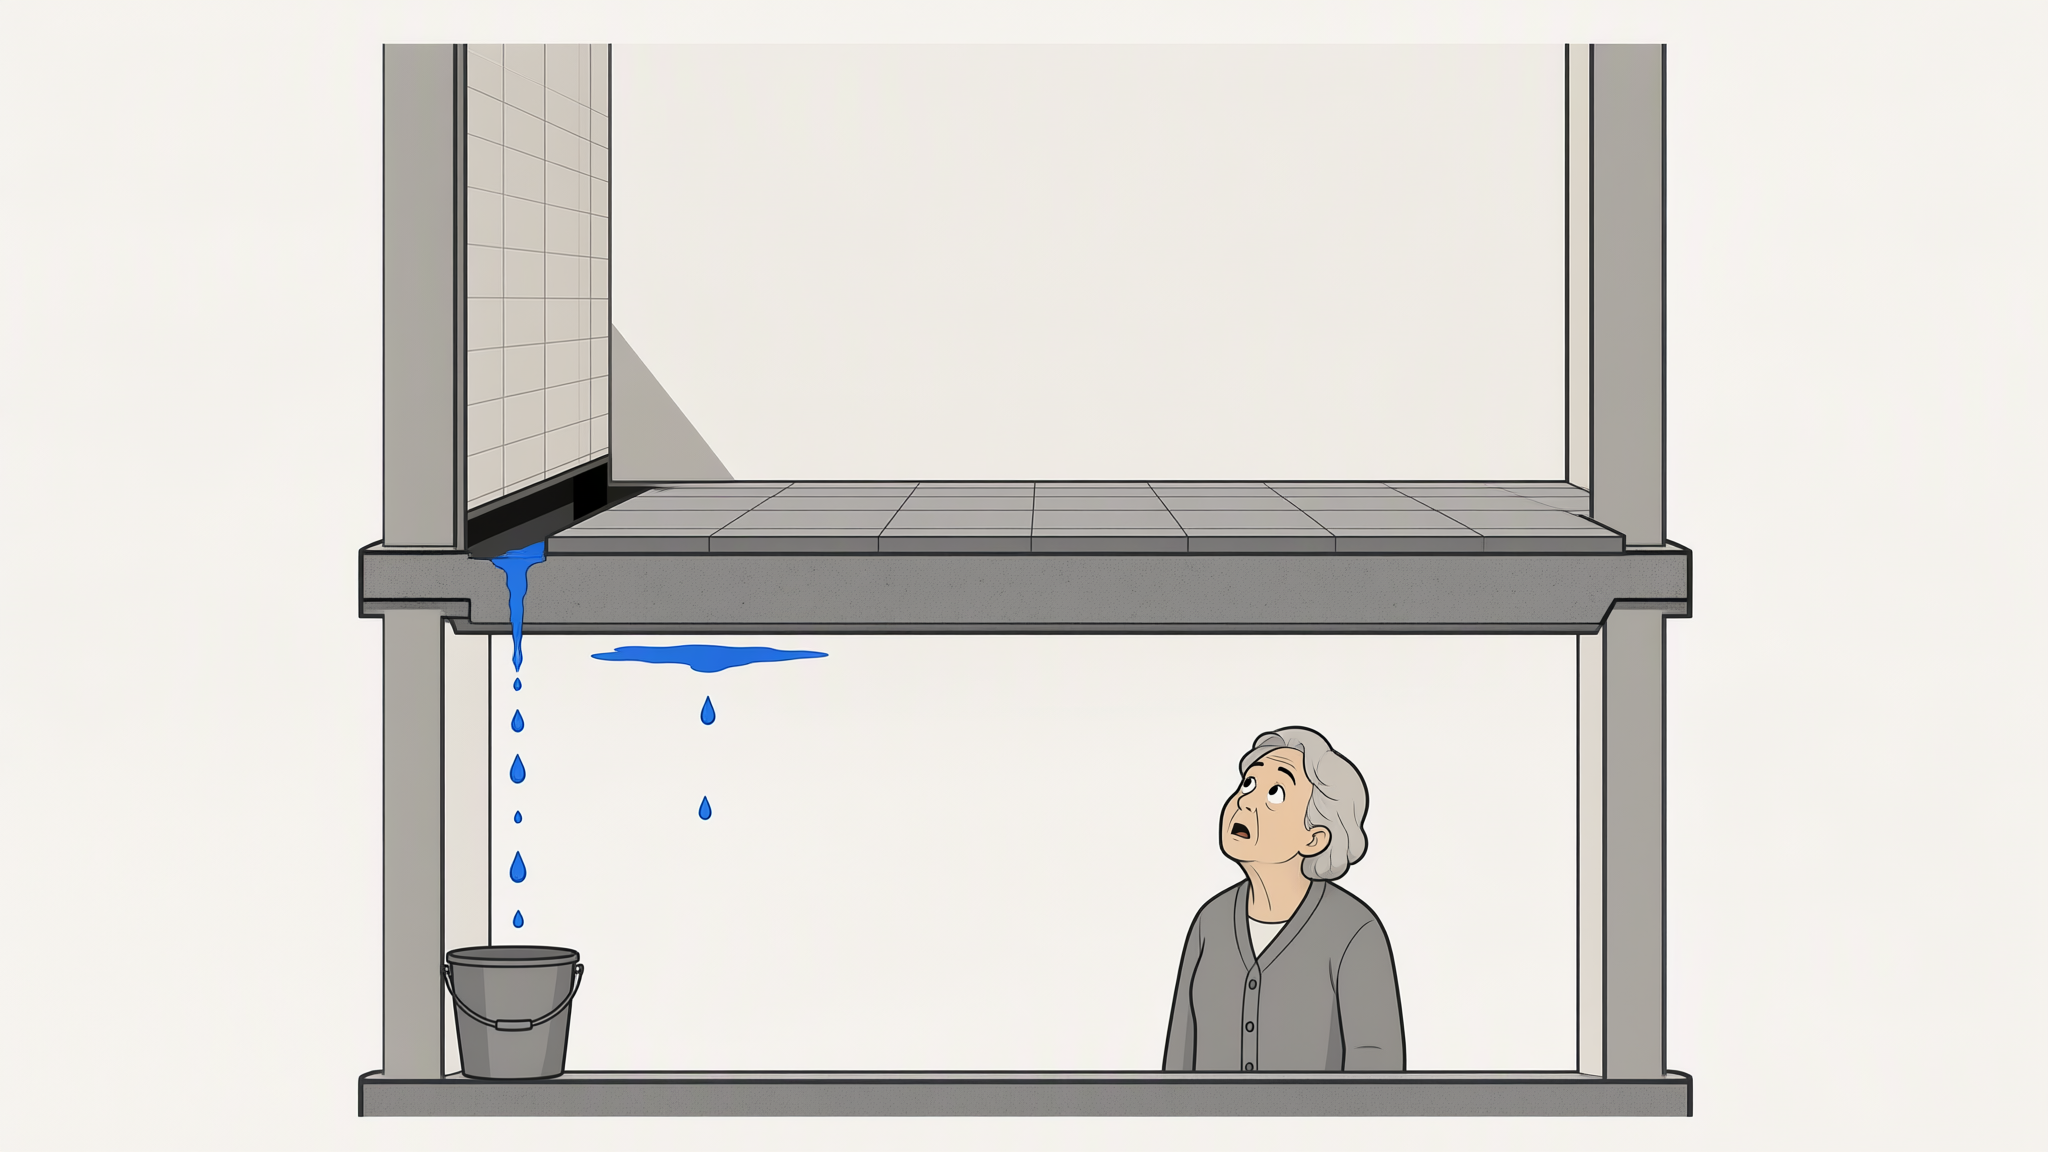
Problem. Tiles themselves absorb almost no water, especially porcelain stoneware. But between the tiles is cement grout, which does absorb water. Joints crack as the substrate moves, and silicone comes away over time. Water that gets under the tiles does not dry out: it sits in the adhesive and slowly seeps through the screed and the floor slab.
Description
Вертикальний розріз двох поверхів. Угорі — ванна кімната з плиткою на підлозі; у лівому куті, де підлога сходиться зі стіною, видно темну щілину — гідроізоляції там немає. Синій струмінь води йде крізь щілину і бетонну плиту вниз. Унизу — кімната сусідки: синя пляма на білій стелі, краплі падають у відро, літня жінка в сірому кардигані здивовано дивиться вгору. Рисунок показує, що вода знаходить найслабше місце — кут без стрічки — і що пляма в сусідів може з'явитися не точно під місцем протікання. Рисунок не показує, скільки часу проходить: зазвичай це тижні або місяці.
Solution. A continuous waterproof layer is applied under the tiles — a liquid-applied waterproofing membrane. It lies between the substrate and the adhesive and stops water from reaching the floor slab.
Cost. For a typical bathroom: one bucket of membrane, a roll of tape, primer and one to two days of work including the waits (calculation in section 8). It is a small share of the renovation budget, while a mistake costs many times more.
2. Where waterproofing is needed
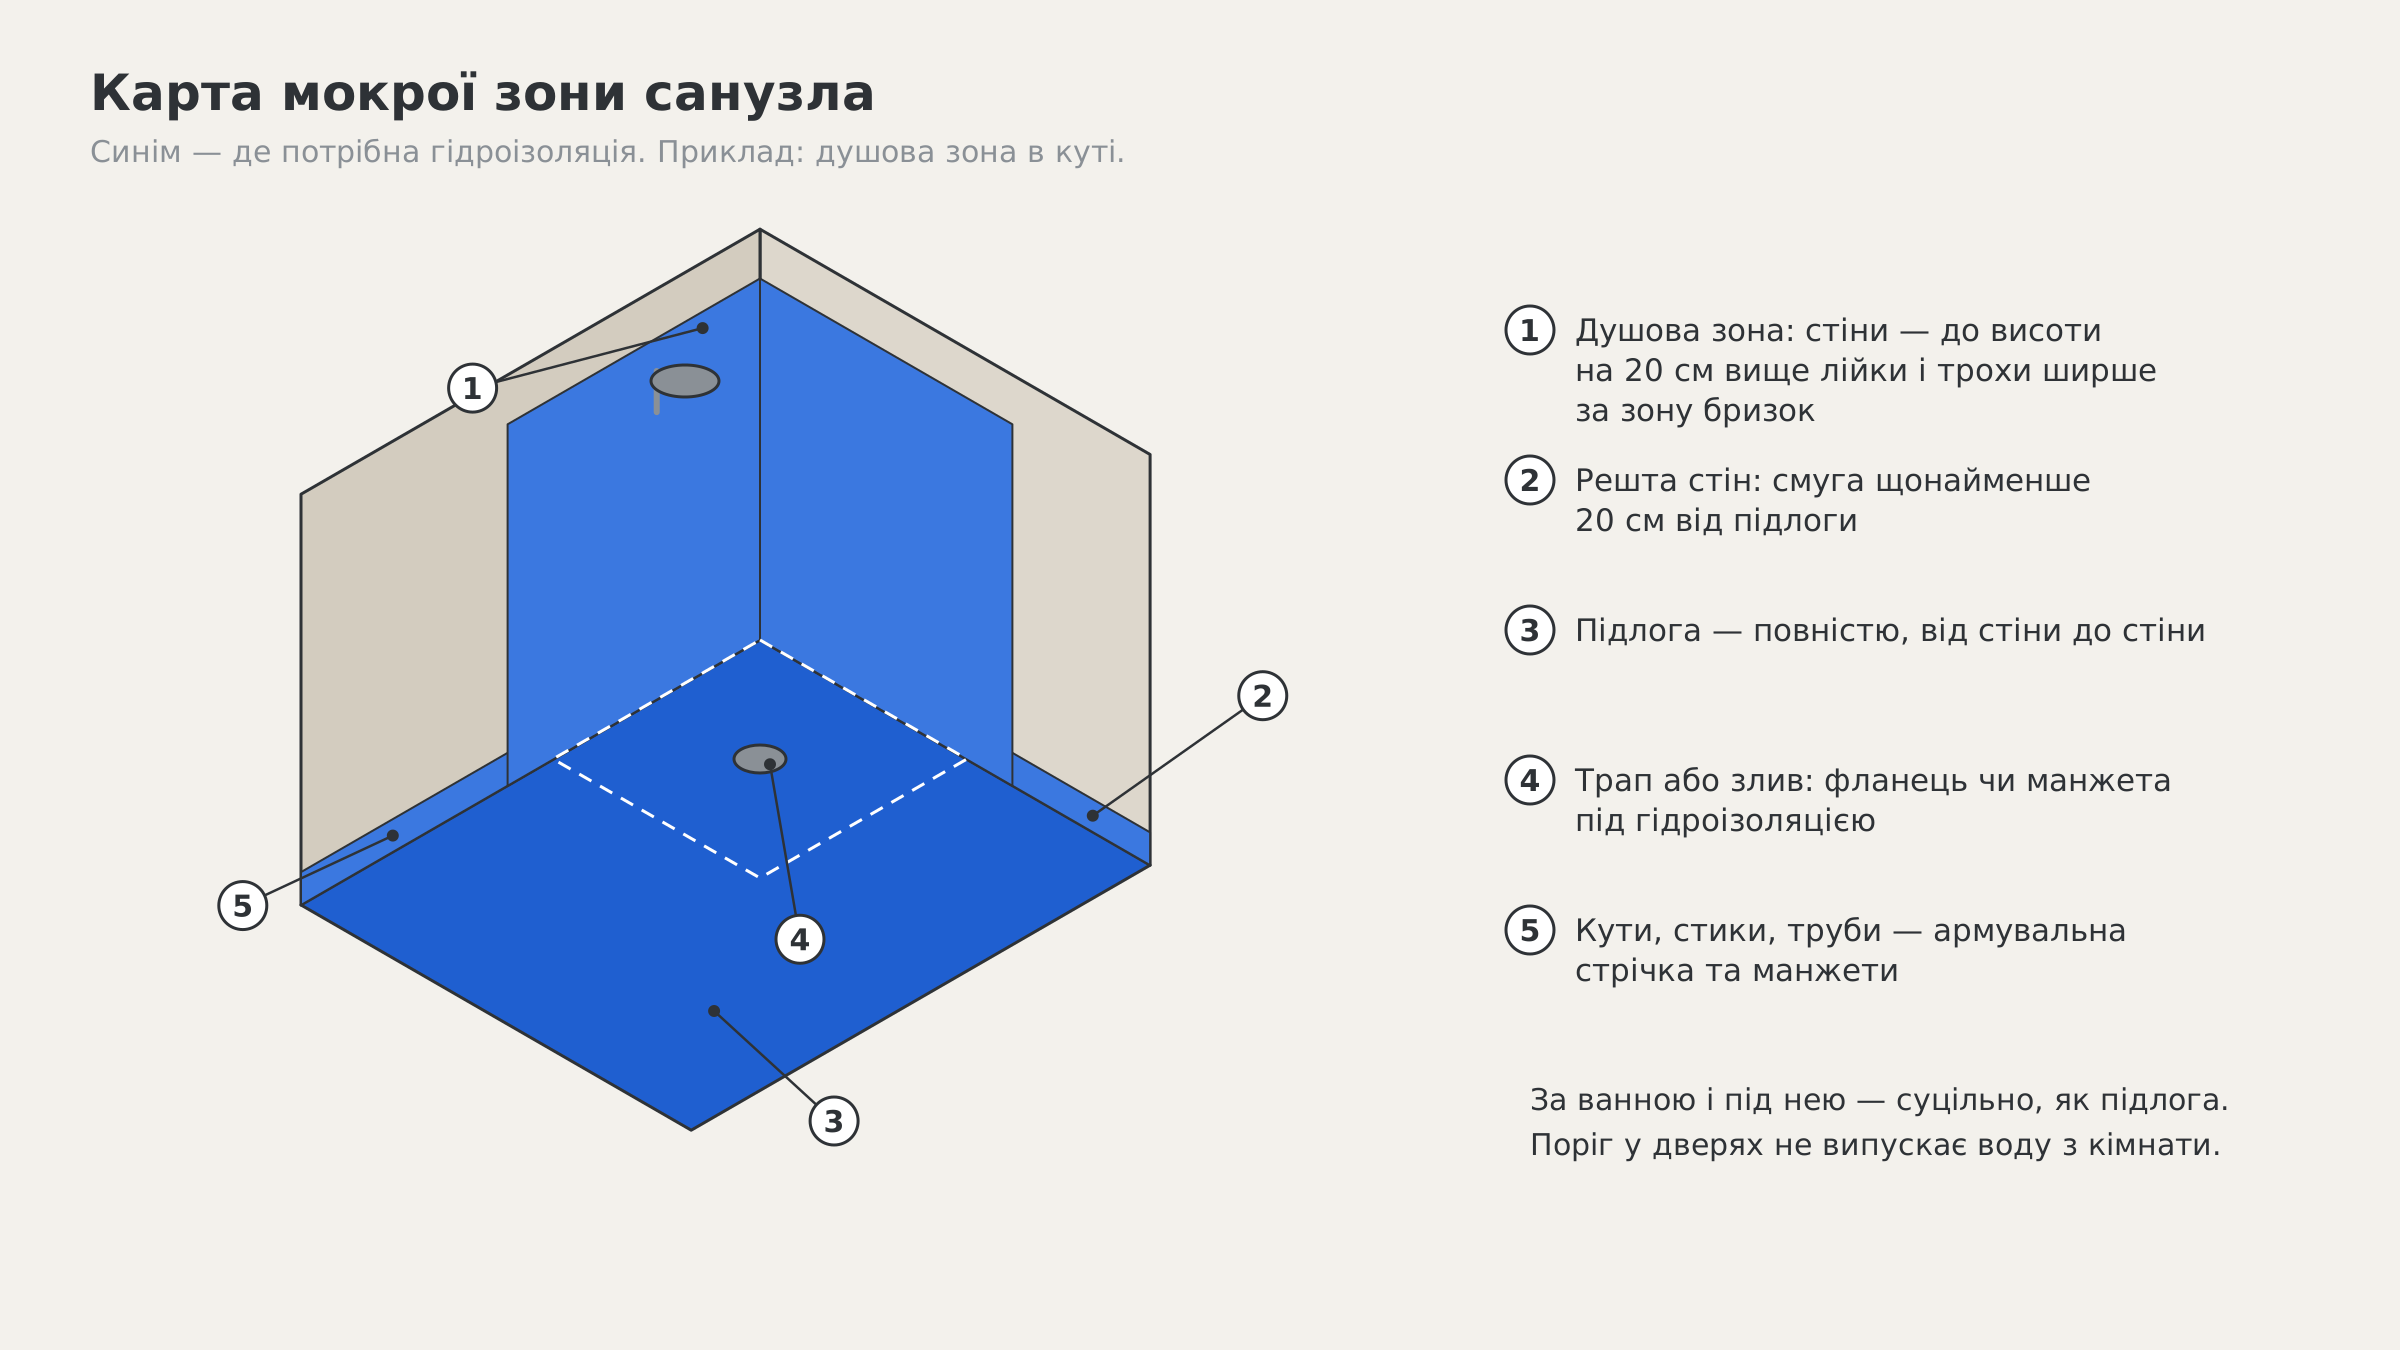
The wet zone is not the whole room. The boundaries are guided by the German standard DIN 18534, which waterproofing manufacturers rely on. It divides surfaces by water exposure into classes from W0-I (occasional water, splashes) to W3-I (constant water, as in public showers). For a flat, the practical rules are as follows.
Description
Ізометричний вигляд санвузла без плитки. Синім позначено, де потрібна гідроізоляція. 1 — душова зона в куті: обидві стіни вкриті до висоти на 20 см вище лійки і трохи ширше за зону бризок. 2 — решта стін: смуга щонайменше 20 см від підлоги. 3 — уся підлога, від стіни до стіни. 4 — трап або злив з фланцем чи манжетою під гідроізоляцією. 5 — кути, стики й труби, де вклеюють армувальну стрічку й манжети. Підписи під схемою: за ванною і під нею — суцільно, як підлога; поріг у дверях не випускає воду з кімнати. Схема не показує стелю й стіни поза мокрою зоною: там гідроізоляція зазвичай не потрібна.
| Surface | What to do |
|---|---|
| Bathroom floor | all of it, wall to wall |
| Walls around the perimeter | a strip at least 20 cm up from the floor |
| Walls in the shower area | up to 20 cm above the highest point water comes from (the shower head), and slightly wider than the splash zone |
| Behind and under the bath | continuously, like the floor |
| Above a bath with a shower | like the shower area |
| Other walls, ceiling | usually not needed |
| Kitchen backsplash | usually not needed: tiles and good-quality grout are enough |
Door threshold. If the bathroom floor is level with the hallway, water from a leak will run under the door. A threshold or a step in height keeps the water in the room while you shut off the water supply. It is also needed for the flood test.
Cost of the boundary. The larger the area, the more membrane and time. But you must not skimp on height in the shower: that is exactly where the splashes go every day.
3. Which material to choose
For a bathroom, the easiest option for a beginner is a ready-mixed flexible membrane in a bucket: it needs no mixing, it is applied with a brush or roller, and its colour shows any gaps.
| Type | Examples on the market (Epicentr, October 2026) | What for | Limitations |
|---|---|---|---|
| Ready-mixed polymer membrane (dispersion) | Ceresit CL 51, 14 kg — 2 992 UAH; Lacrysil AQUA BLOCK, 7 kg — 1 519 UAH | bathroom with a bath or shower tray, shower area walls | indoors only; not for pools or constant water; not for the floor of a shower without a tray |
| Two-component flexible polymer-cement | Mapei Mapelastic A+B, 16 kg — 3 582 UAH | a wider range of uses, including wetter areas — as per the data sheet | the two parts must be mixed exactly |
| Dry mix | Polimin GI-1 AQUA BARRIER, 25 kg — 608 UAH | — | read the data sheet: mixes can be rigid or flexible; corners and substrates subject to movement need a flexible one |
What to look for in the data sheet:
- substrate: what it can be applied to (concrete, plaster, plasterboard) and what it cannot;
- temperature and humidity during application;
- how many coats and the total thickness;
- waits: between coats and before tiling;
- compatible tapes and collars from the same system.
For CL 51 the data sheet says: indoor use only; apply at temperatures from +5 to +35 °C and air humidity no higher than 80 %; CT 17 primer is mandatory; do not apply over liquid bitumen, old tiles or old paint; not for pools or areas with constant water.
A shower without a tray, with a drain in the floor, is a special case. Under DIN 18534 the floor of such a shower is class W2-I, and polymer dispersion membranes are permitted for class W2-I only on walls. A different system is needed, with precise falls and a correctly installed drain. The course covers this in an optional unit and advises handing the work over to a professional.
4. Preparing the substrate
Problem. Waterproofing holds only as well as the substrate beneath it. On dust, wet plaster or old paint it will come away — and the tiles with it.
Solution:
- The substrate is sound: nothing crumbles or flakes, and it does not sound hollow when tapped (how to check is covered in the substrate unit).
- The substrate is dry. For gypsum substrates under CL 51, moisture no more than 0.5 %; gypsum plaster at least 15 mm thick.
- The substrate is clean: dust-free, with no grease stains, efflorescence or mould. Mould is removed mechanically, and the area is treated with a special product and dried.
- Corners and joints have no sharp protrusions; deep gouges are filled with repair mortar in advance.
- Priming. CT 17 at 0.1–0.2 l/m², one or two coats depending on the substrate. Dries in 4–6 h (at +20 °C and 55 % humidity).
Cost. Preparation takes longer than the application itself. But once it is done, it is hard to go wrong with the application.
5. Order of application
Description
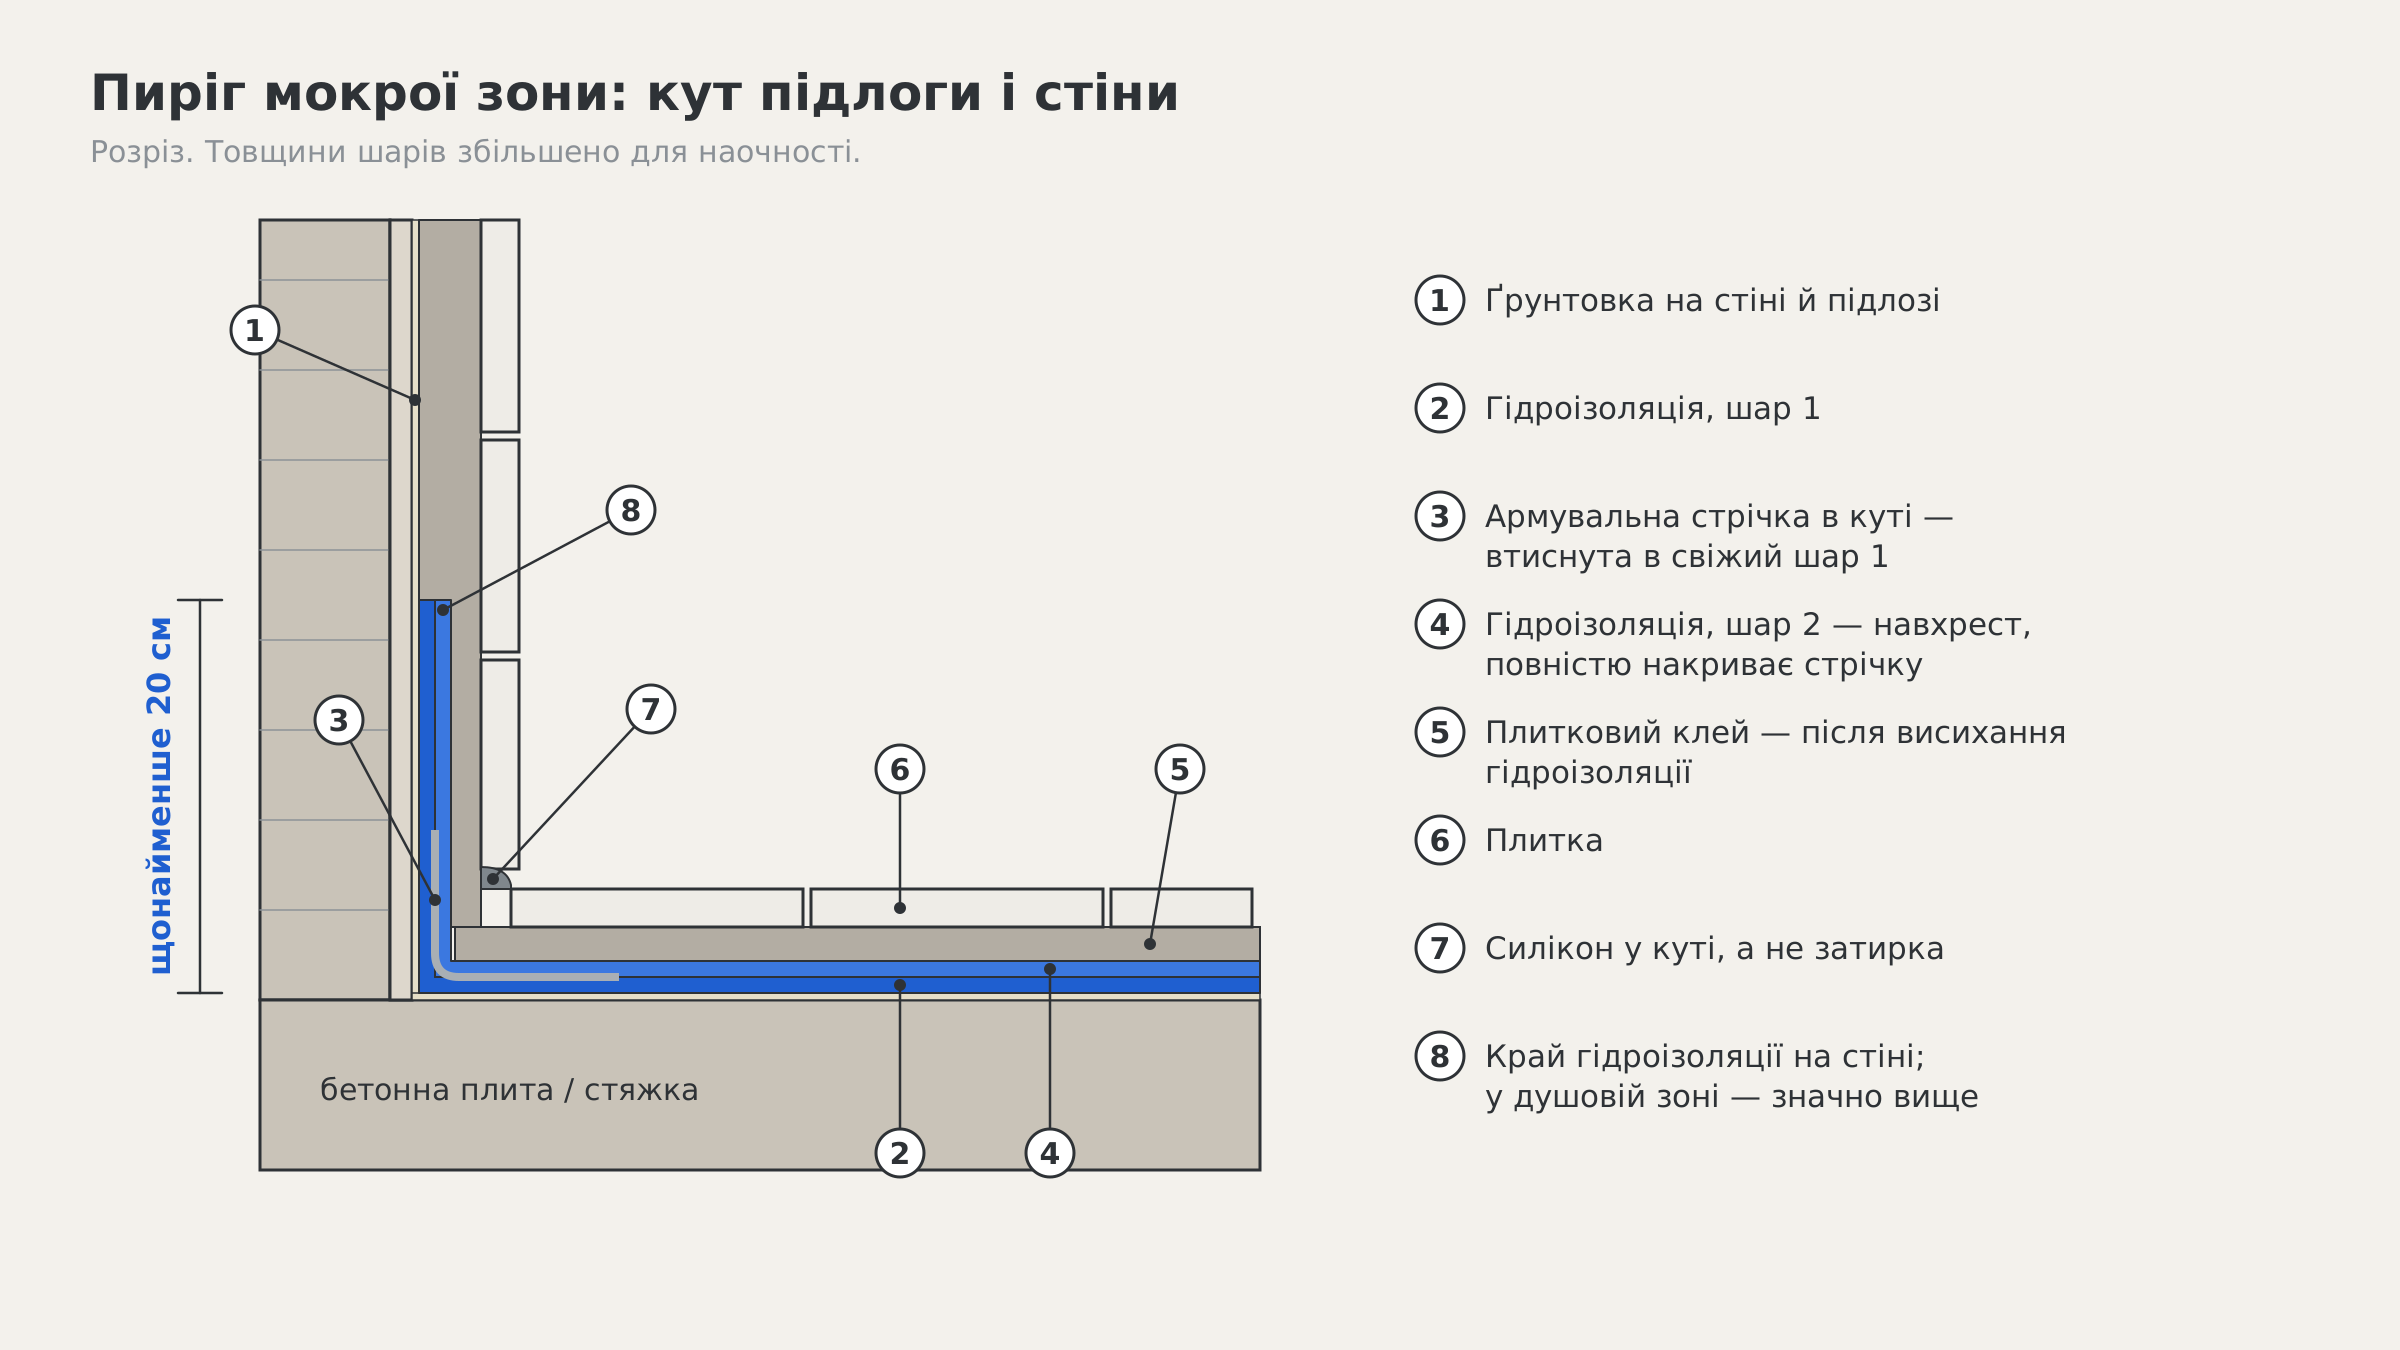
Технічний розріз кута, де підлога сходиться зі стіною; товщини шарів збільшено. Знизу вгору і від стіни: бетонна плита і стіна; 1 — ґрунтовка на стіні й підлозі; 2 — перший шар гідроізоляції; 3 — армувальна стрічка в куті, вигнута петлею і втиснута в свіжий перший шар; 4 — другий шар гідроізоляції навхрест, що повністю накриває стрічку; 5 — плитковий клей, нанесений після висихання гідроізоляції; 6 — плитка; 7 — силікон у куті між плиткою стіни і підлоги, а не затирка; 8 — верхній край гідроізоляції на стіні; збоку розмір «щонайменше 20 см», у душовій зоні гідроізоляція йде значно вище. Схема не показує вузли труб і трапа — вони на окремому рисунку.
The order for CL 51 (other products — as per their data sheet):
- Primer CT 17 over the whole area to be waterproofed. Wait 4–6 h.
- Prepare the tape and collars. Cut the tape into lengths for the corners and joints, and try the collars on the pipes. CL 152 tape, 120 mm wide, is laid centred on the corner. Where pieces meet, common practice is an overlap of at least 5 cm.
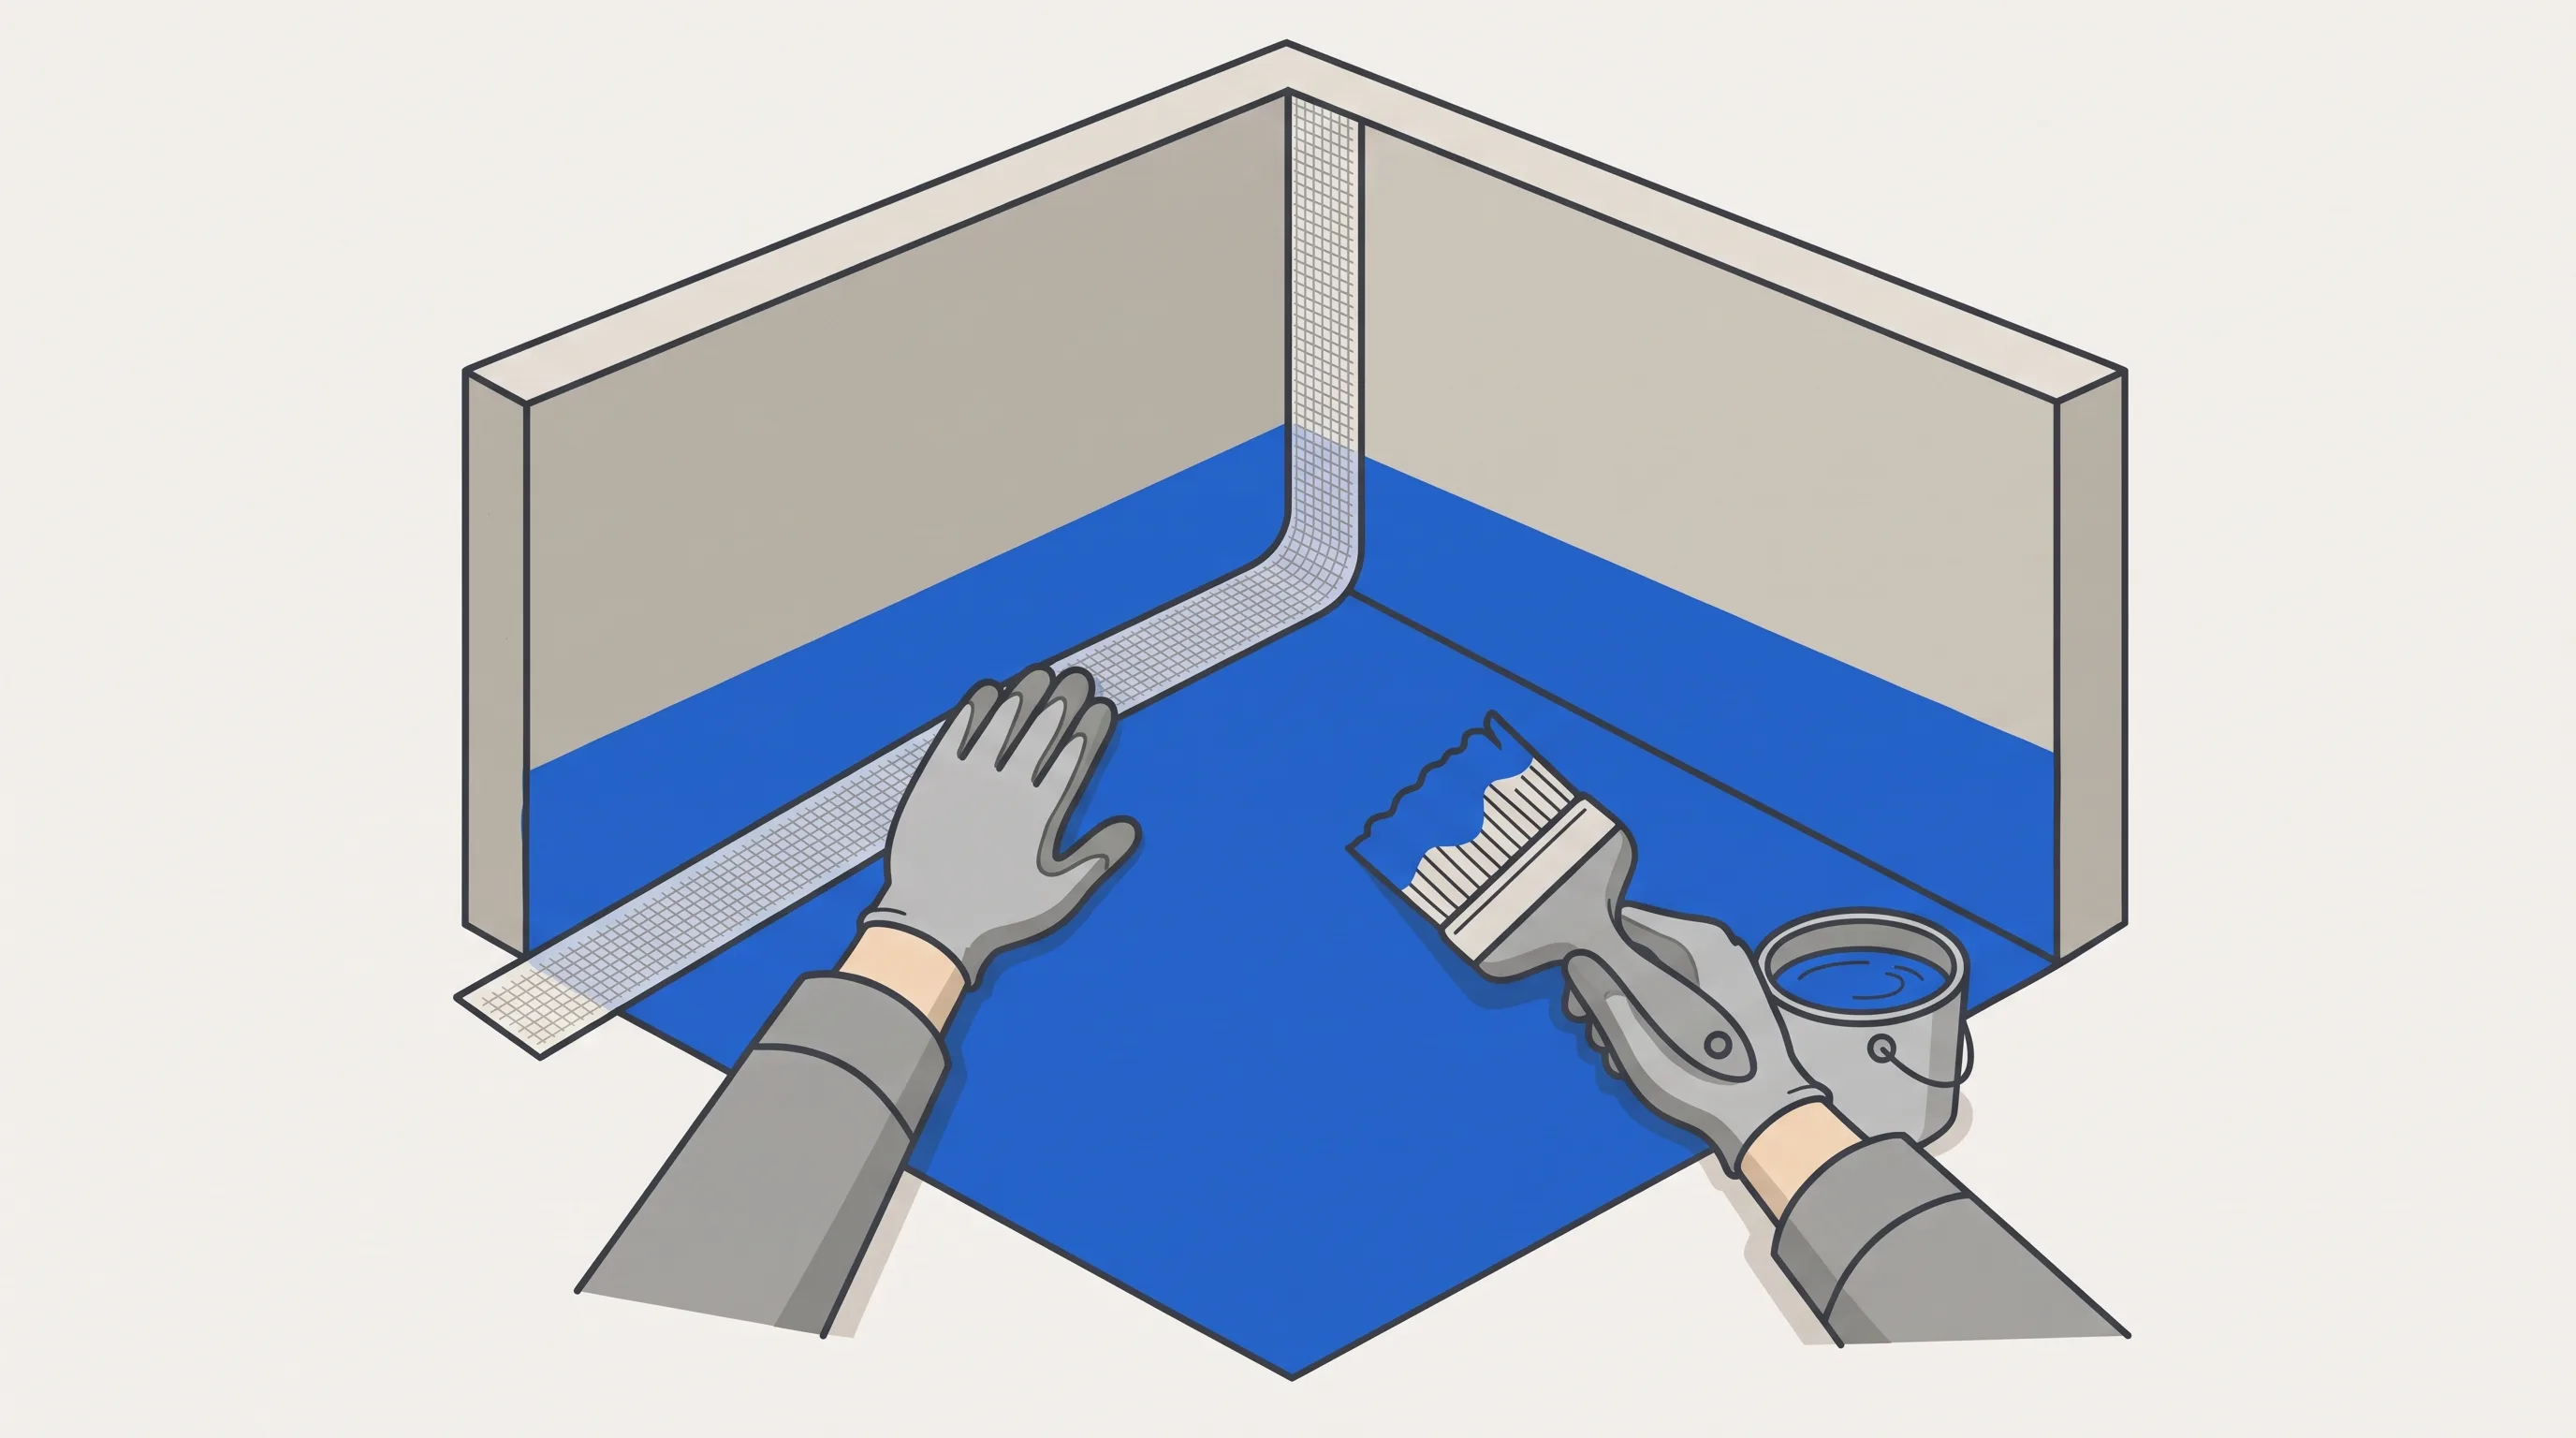
- First coat — corners first. Apply a strip of membrane into the corner and along the joints, immediately press the tape into it and smooth it lightly with a brush so that no air or creases remain. Bed the collars onto the pipes and the drain in the same way.
- First coat — the whole area. With a brush or roller, evenly, with no gaps. Dries in about 2 h.
- Second coat — crosswise to the first, and so that it fully covers the tape and the edges of the collars. Total thickness of the two coats: 1–1.5 mm. Dries in about 3 h.
- Wait before tiling — at least 16 h after the second coat. The flood test goes in this wait or after it (section 7).
- The junction with the bath or shower tray — after tiling, with silicone (for the Ceresit system — CS 25), not grout.
Description
Внутрішній кут санвузла без плитки; підлога і нижня частина стін вкриті синьою гідроізоляцією. Ліва рука в сірій рукавиці втискає світло-сіру сітчасту армувальну стрічку в стик підлоги зі стіною; стрічка йде вздовж кута і вгору вертикальним кутом. Права рука тримає широкий пензель, поруч стоїть відро з мастикою. Рисунок показує крок 3: стрічку кладуть у свіжий перший шар, а не на суху поверхню. Рисунок не показує другого шару — після нього стрічки не видно зовсім.
Description
Ланцюжок кроків зліва направо: ґрунтовка CT 17 — пауза 4–6 год — перший шар зі стрічкою і манжетами — пауза приблизно 2 год — другий шар навхрест — після висихання (курс радить добу) тест заливом 24 год — злити воду й висушити — плитка. Пунктирна стрілка від другого шару до плитки підписана «не раніше ніж через 16 год»: це мінімум за техкартою CL 51, навіть якщо тест не роблять. Схема показує, що роботу розтягнуто на дві-три доби, навіть якщо працювати швидко.
Cost. From primer to tiles takes two to three days, of which only a few hours are hands-on work. The waits cannot be shortened: the membrane dries on the surface but is still soft inside, and the adhesive and tiles push through it.
6. Details: pipes, drain, corners
Description
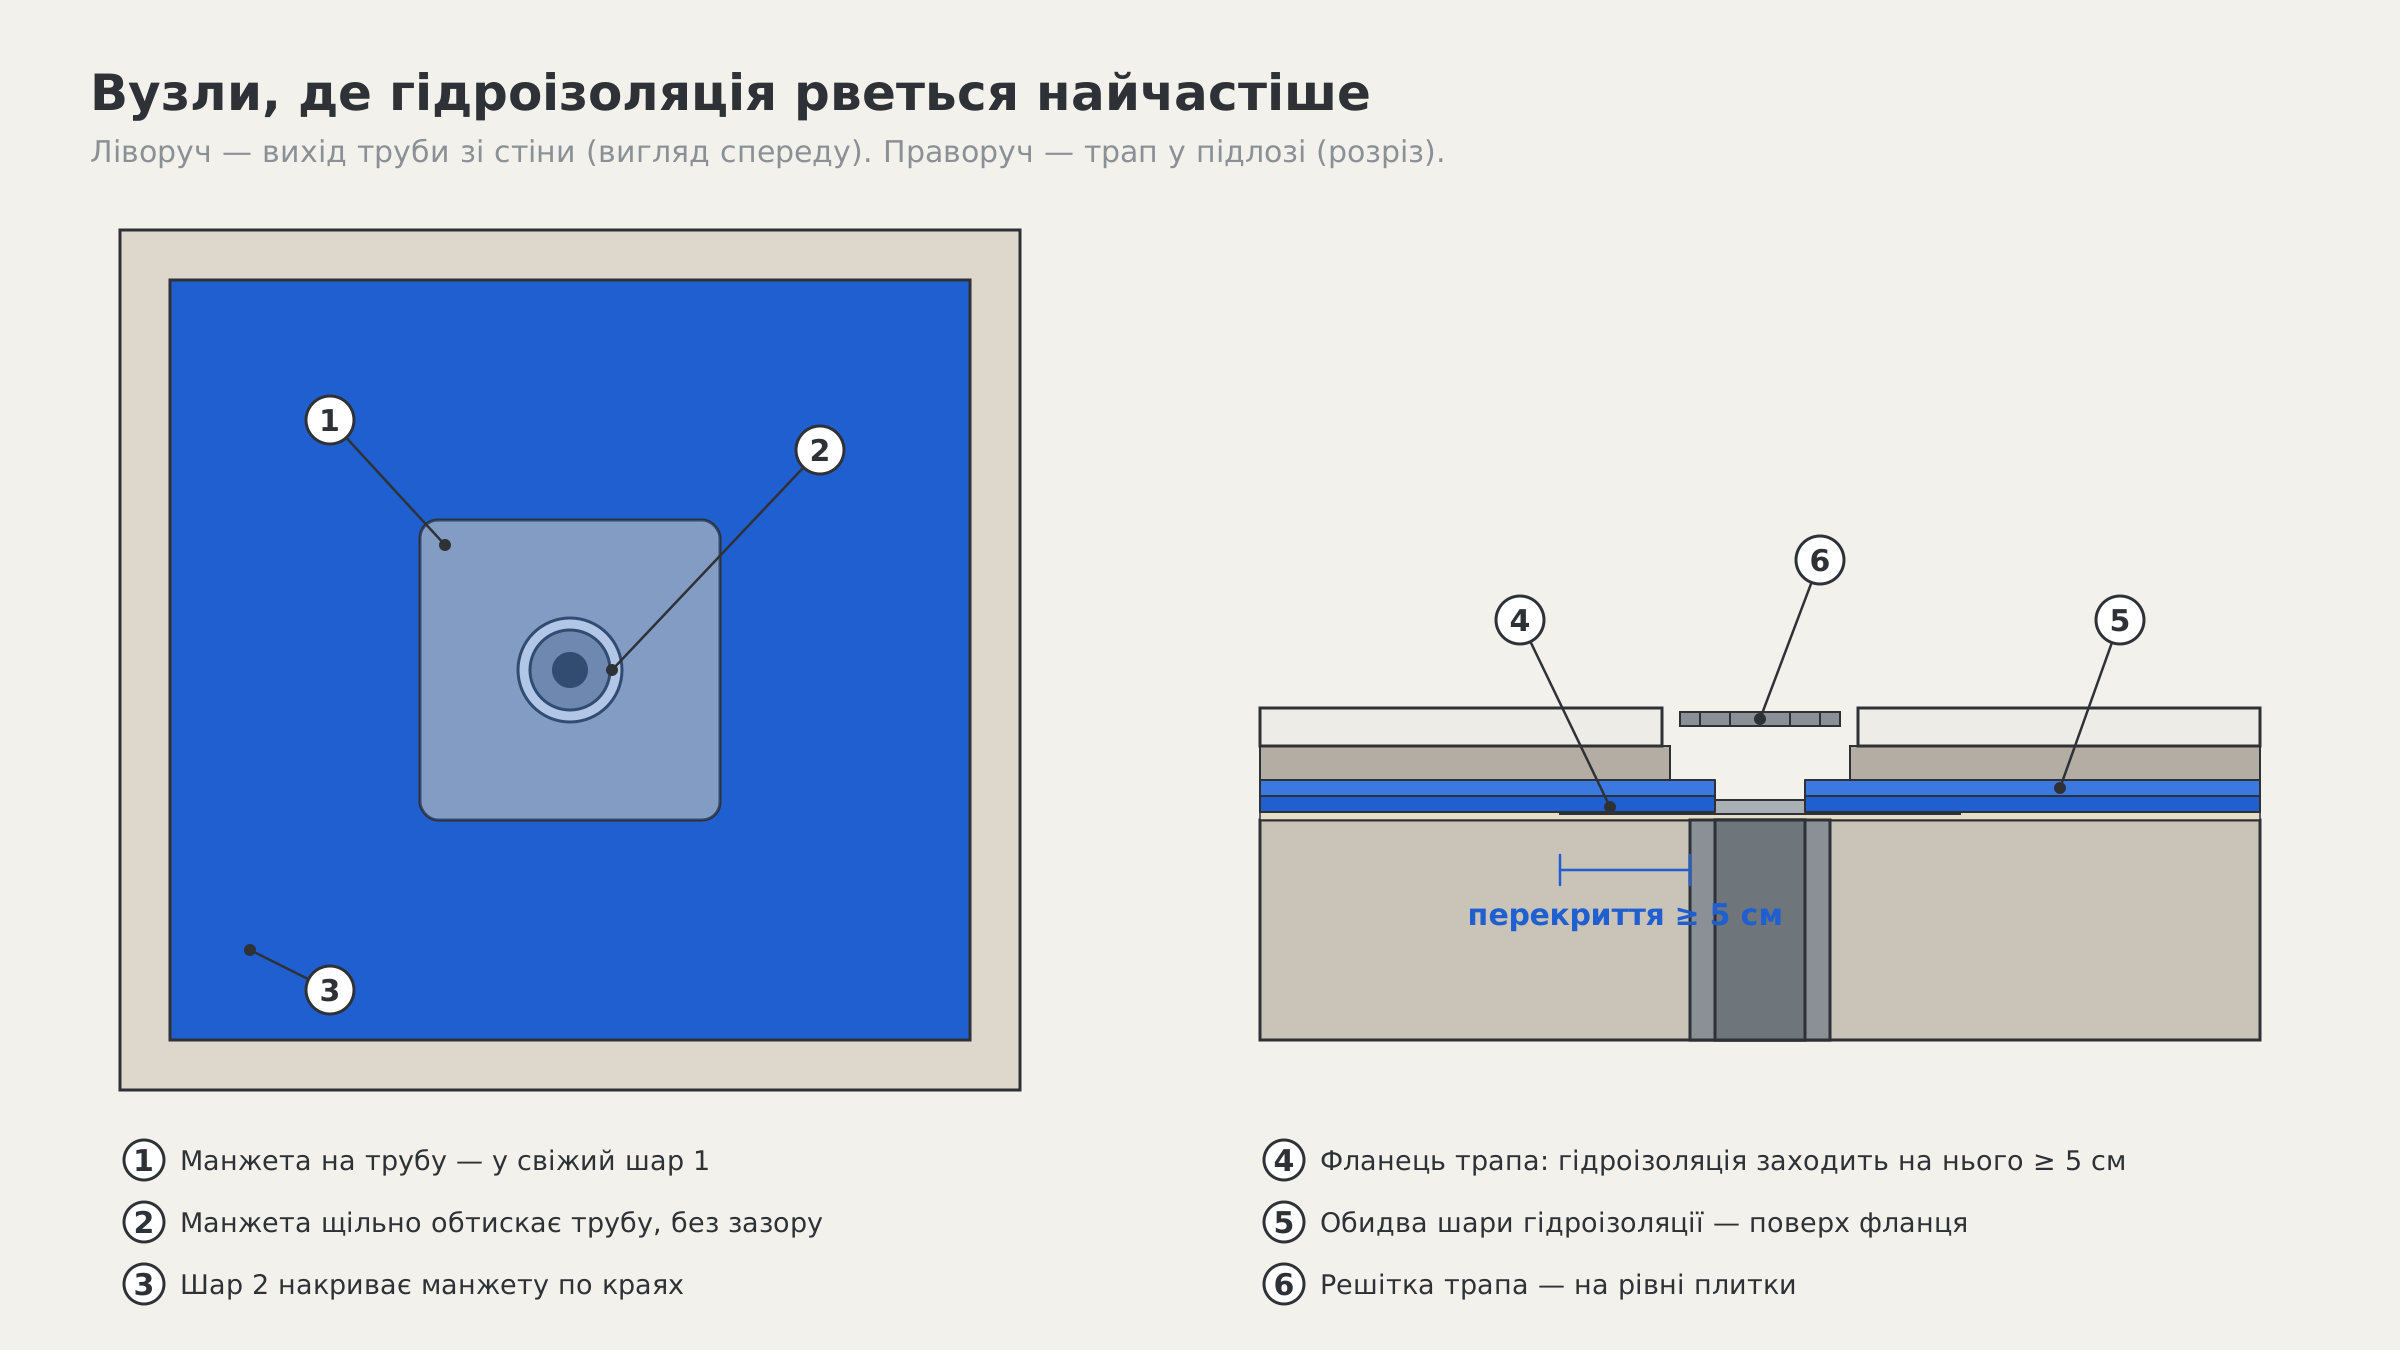
Ліворуч — вигляд спереду на стіну з синьою гідроізоляцією: 1 — квадратна сіра манжета навколо труби, вклеєна в свіжий перший шар; 2 — манжета щільно обтискає трубу, без зазору; 3 — другий шар накриває манжету по краях. Праворуч — розріз підлоги з трапом: 4 — фланець трапа, на який гідроізоляція заходить щонайменше на 5 см (позначено розміром «перекриття ≥ 5 см»); 5 — обидва шари гідроізоляції лежать поверх фланця; 6 — решітка трапа на рівні плитки. Схема не показує ухили підлоги до трапа.
- Internal corners and the floor-to-wall joint — tape into the fresh first coat. Systems offer preformed corner pieces for internal and external corners; they are neater than folded tape.
- Pipes coming out of the wall (mixer tap, toilet and washing machine supply) — rubber collars from the same system. The collar must grip the pipe tightly.
- Waste outlet, floor drain — the drain flange or collar must lie under the waterproofing with an overlap of at least 5 cm (DIN 18534 requires flanges at least 50 mm wide).
- Movement joints in the substrate — the tape is laid into the joint in a loop.
Without tape and collars, waterproofing holds water only on a flat surface. These details are exactly where it tears first.
7. Flood test
The flood test is recommended practice, not a data sheet requirement. It takes a day and shows a leak before the tiles hide the water.
Description
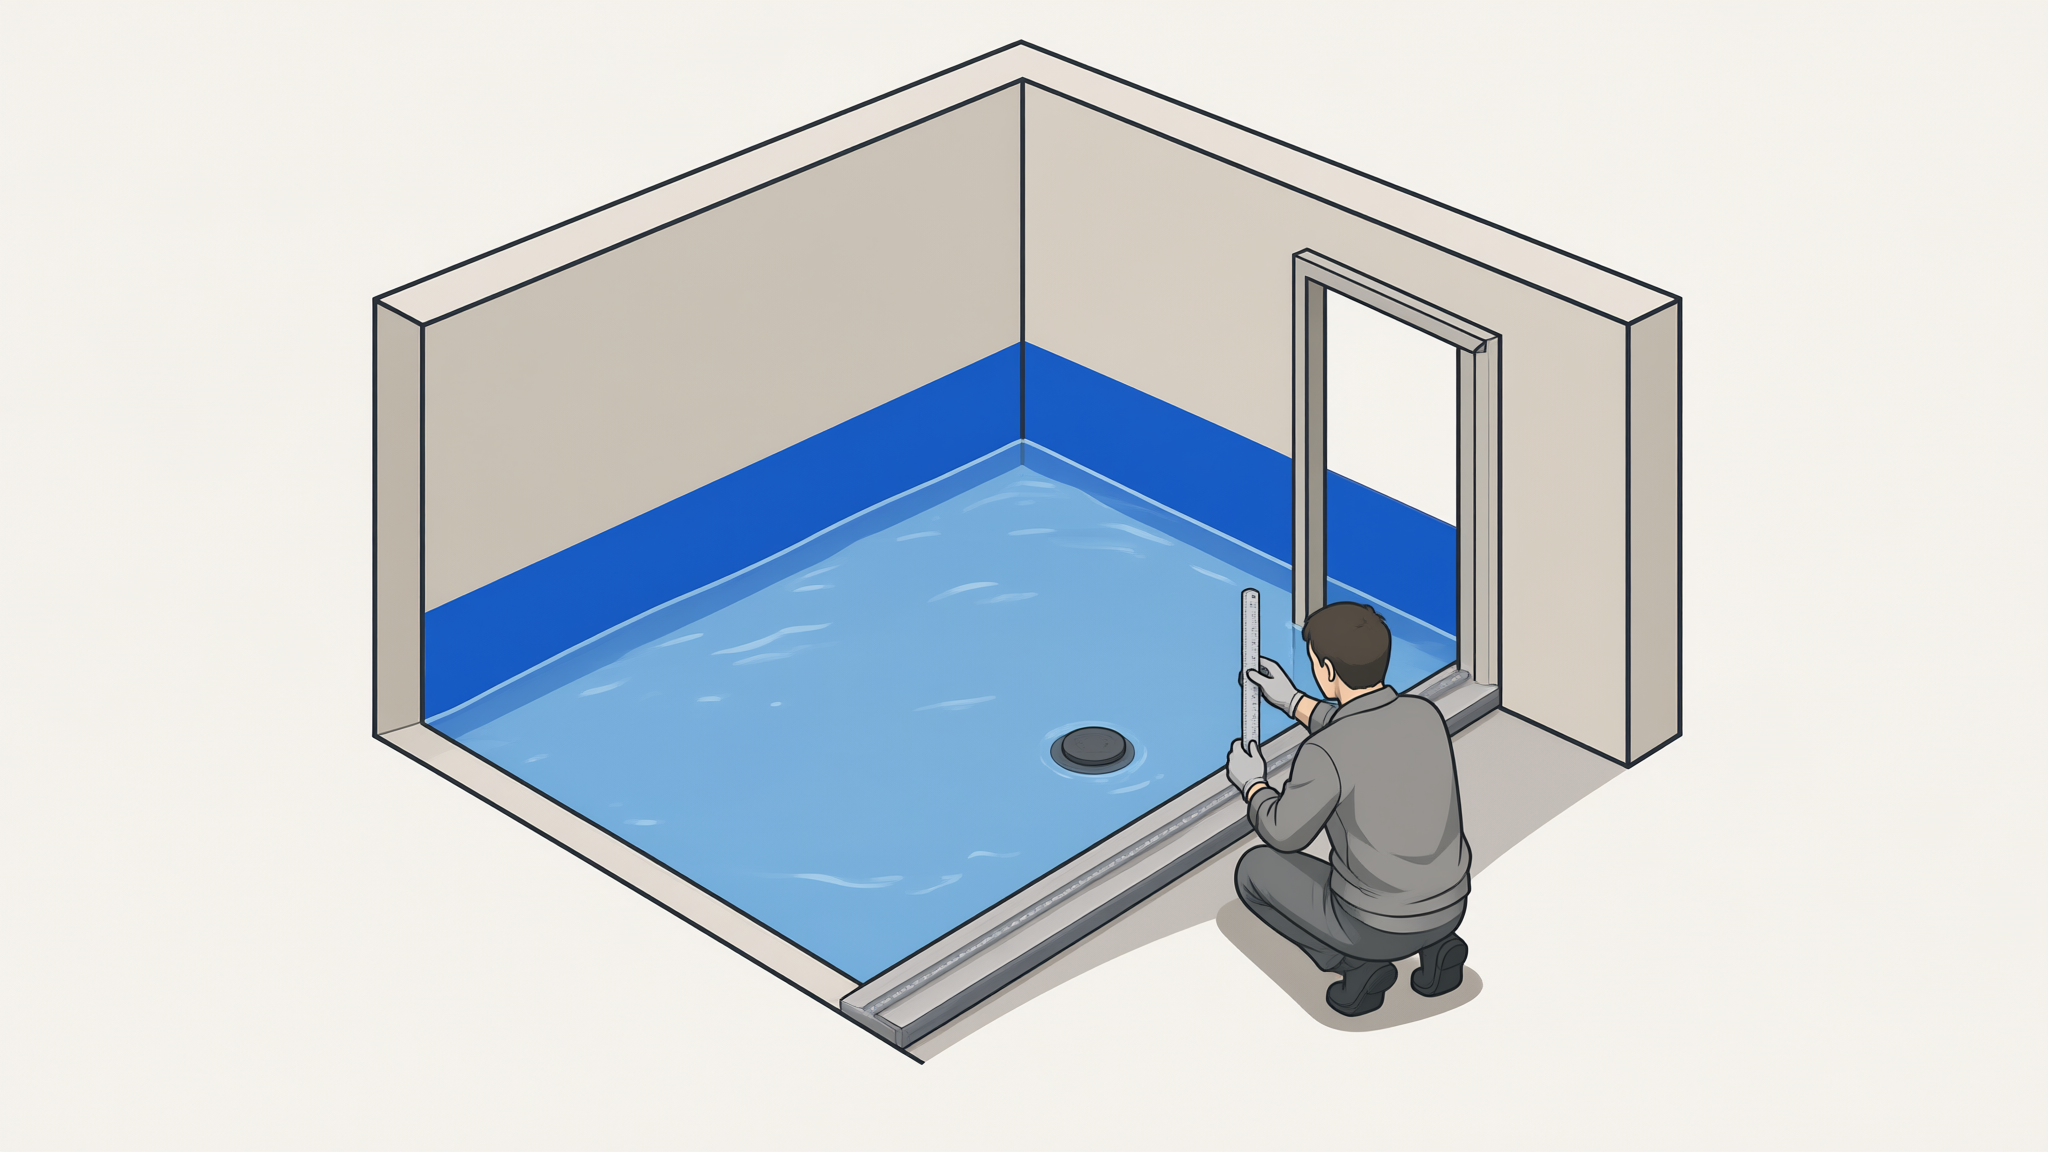
Ізометричний вигляд санвузла без плитки: підлога і смуга на стінах вкриті синьою гідроізоляцією, поверх неї — тонкий шар води по всій підлозі. Злив у центрі закритий гумовою пробкою. Біля дверного отвору лежить низька дошка-перегородка, що тримає воду в кімнаті. Чоловік у сірому робочому одязі присів біля дошки і тримає складаний метр у воді — фіксує рівень. Рисунок показує сам тест; він не показує, що потрібно заздалегідь попередити сусідів знизу і перевірити їхню стелю наступного дня.
- Wait until the waterproofing has fully dried. The minimum is as per the data sheet; the course recommends a day after the second coat.
- Warn the neighbours below and ask if you may look at their ceiling tomorrow.
- Plug the waste outlet and the drain, and put a temporary threshold across the doorway (a board set in silicone or a strip of sealant).
- Pour in water 1–2 cm deep over the whole floor. Mark the level in pencil on the wall or measure it with a folding rule.
- Leave it for 24 h.
- Check: the water level (a few millimetres may evaporate), the neighbours' ceiling, the hallway walls by the threshold.
- If it is dry — drain the water, let it dry and lay the tiles.
- If there is a stain or the level has dropped noticeably — drain the water, dry it out, find the leak (most often a corner, a pipe or the waste outlet), repair it according to the method and repeat the test.
Cost. A day of waiting and an awkward conversation with the neighbours. Compare that with repairing their ceiling.
8. How much to buy and what it costs
Example: bathroom 1.7 × 2.0 m, shower area in the corner 0.9 × 0.9 m, shower head at a height of 2.0 m.
- Floor: 1.7 × 2.0 = 3.4 m².
- 20 cm strip around the perimeter: perimeter 7.4 m minus the door 0.7 m = 6.7 m; 6.7 × 0.2 = 1.34 m².
- Shower area on two walls: width 0.9 + 0.2 m margin = 1.1 m on each wall, height 2.0 + 0.2 = 2.2 m. Minus the bottom 20 cm already counted in the strip: 2 × 1.1 × 2.0 = 4.4 m².
- Total ≈ 9.1 m².
CL 51 coverage according to the data sheet is 0.4 to 2.1 kg/m² for two coats: it all depends on how flat the substrate is and on your hand. A beginner applies it thicker, so for buying allow about 1.5 kg/m²: 9.1 × 1.5 ≈ 13.7 kg — one 14 kg bucket (2 992 UAH at Epicentr, October 2026).
- Primer: 9.1 m² × 0.2 l ≈ 2 l (with extra for two coats on weak spots).
- Tape: floor-to-wall joint 6.7 m + vertical shower corner 2.2 m + other vertical corners up to the strip height ≈ 0.6 m ≈ 9.5 m — a 10 m roll.
- Collars: one per pipe in the wet zone, plus one for the waste outlet.
Prices change. Check them in the shop before buying.
9. When to stop and call a professional
- A shower without a tray with a drain in the floor — a different system and falls (an optional unit of the course).
- The neighbours' ceiling already shows signs of leaks, or the floor slab is wet and is not drying out.
- The substrate crumbles and the plaster is coming away in large areas.
- The flood test has shown a leak twice, and you have not found where it is.
Summary
- Tiles and grout do not hold back water — the layer underneath them does.
- Wet zone: the whole floor, a 20 cm strip on the walls, the shower area up to 20 cm above the shower head, the space behind the bath.
- Order: substrate → primer → coat 1 with tape and collars → coat 2 crosswise → wait ≥ 16 h → flood test → tiles.
- Take your figures from the data sheet of your own product.
- The flood test is a day of waiting that insures you against the most expensive mistake in the course.